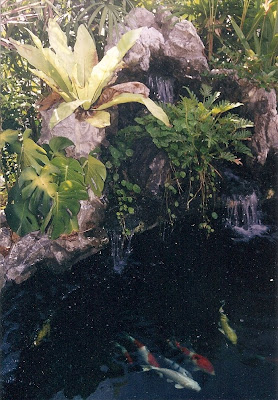
The photo above is that of a Koi (Japanese carp). This one is a Goromo - one of the many different varieties of Koi . One of my first and certainly not my last.


Search This Blog

Friday, January 30, 2009

What price for a Koi

Beauty is in the eyes of the beholder and how much is a Koi worth or how much you need to pay for a Koi is pretty much dependent on what value you place on a Koi that you fancy.

In general, price of a Koi can range from free-of-charge to tens of thousands of dollars.

During the breeding cycle, baby Koi are regularly selected by the breeders based on their potential to grow into a champion Koi. The selected Koi are well fed and kept in special ponds with the right conditions to maximise the chance that they will turn up as a future champion Koi or tategoi that can be sold for lots of money. The rejected babies are culled. Culling takes place often in the first year and breeders often discard unwanted baby Koi or sell them as fish food for predatory fish. One year old Koi that are “discarded” by breeders are sold for as low as a few dollars a piece.

At the other end of the spectrum, one year old tategoi can be sold for thousands of dollars. “Show-grade” tategoi are often those with good bloodlines (offsprings of parents who are Champions), from reputed breeders in Japan and are of the Kohaku, Sanke and Showa varieties. In the last Koi show held in Singapore, Koi were being auctioned off at the end of the show. There are bidders who are willing to pay up to $5000 for a 2 year old Koi. “Is a Koi worth so much money?”, you may ask. Well, for a tategoi that has the potential to mature into a future Grand Champion in Koi shows, it may be seen as a good investment. A Grand Champion or Koi that has won awards in a Koi show may be worth tens of thousand.

In between, we may get the “pond-grade” Koi that  are sold for a few hundred dollars. These are usually young Koi, of excellent quality but somehow not considered by the breeders to be a potential champion or show winner. They are still good to look at and will brighten up your pond or landscape. Many Koi hobbyist would love to own a young Koi (one year old tosai or two year old nisai) and dream of the day they will grow into a champion Koi. In my opinion, they are the best Koi to buy for your pond. They will not burn a hole in your pocket and still gives you the hope and joy of seeing a young Koi matures into a show-winner. Or at least, a beautiful Koi in your pond that you can be proud of.

Sunday, January 18, 2009

Lesson learnt from my first pond – filter design

Being my first pond and also due to space constraint, the design of my first pond filter has many shortcomings and areas for improvement. These are the lessons learnt and features which was incorporated into my second pond filter design and third pond filter design.

Separate Drain and Pump Chamber

koi pond filter schematic diagram

My first pond’s filter (above) does not have a separate chamber to house my drain pump. I need to stop the pond water return pumps during maintenance and turn on the drain pump to remove water from the filter into the drain. That is not a big issue.

The bigger problem is with this: when I removed the 3 standpipes in my pump chamber to flush the dirt from the bottom of my filter, the waste water and dirt from the bottom of the filter chambers are mixed with the regular water in the pump chamber. I need to flush out all the water in the pump chamber before I can turn on the main pumps again. This makes the process of removing the waste from the bottom drains of the filter not efficient and unless I remove a substantial amount of water, some of the dirt are circulated back to the pond. Filter maintenance and water changes take about one hour.

A better design, which was used in the filter for my second and third pond, is to separate the drain/sludge chamber from the return pump chamber as shown below.

koi pond filter schematic diagram with separate pump and drain chambers

Instead of using standpipes, ball valves are used to open and close the bottom drains. The photo (actually from my current pond filter) below shows a sludge chamber with drain pump and ball valves in operation.

koi pond Sludge Chamber with drain pump and control ball valves

A long PVC pipe, with tailored ends as shown, allows the valves to be operated easily from above.

Valve Operation Tool

With this design, I can continue to operate my main return pumps while I extract waste water from the bottoms of the filter chambers. This facilitates easy and efficient partial water changes and clearing of the waste collected at the bottom of the filter chambers. It is so easy that which I can do this almost daily or at least weekly.

Need for mechanical filtration or settlement at the filter inlet

Due to space constrain in my backyard, my filter does not have many chambers. In the case of my first filter, my filter mats act as a mechanical filter in the first chamber. This means that the filter mats gets choked after a few months. The symptom is lowered water level in the pump chambers. When these happens, I will have to remove all the filter mats from the first chamber for cleaning, and thereby disturbing the bacteria essential for biological filtration. Quite a lot of work for me too. Not good. Unfortunately, the filter for my second pond did not provide for a mechanical filtration in the first chamber as well.

My third pond filter did! It has a chamber (photo below) to allow for solid waste to settle before going into the filter media. Visible at the bottom of the settling chamber are the inlet pipes from the pond’s bottom drains. Standpipes can be inserted into this inlets to close them off during filter maintenance.

inlet chamber with water inlet pipe and stand pipes controlling water from Koi pond

After the settling chamber, the first stage of the filter provide mechanical filtration by using brushes. This is to trap solid wastes and debris like fallen leaves which can then be removed and hosed down when needed.filter brushes for mechanical filtration at second chamber of koi pond filter

Wednesday, January 14, 2009

Mystery of the Missing Koi

The day I lost a fish and found one

It is a good practice to do a count of your Koi daily. This is best done during the daily feeding. Fish could be lost through predation, jumping out of pond and, in the case of my first pond, lost through poor pond design.

The issue was with the use of wire mesh to cover my bottom drains. More sophisticated covers could have been used, and which I will recommend, but this being my first pond, I left it to the pond builder to implement a low cost, cut-to-size wire mesh simply placed over the bottom drain.

low cost, cut-to-size wire mesh simply placed over the bottom drain of koi pond

This works fine until a time when the wire mesh gets covered with algae growth. Koi feeding on the algae could dislodge it and that’s is probably what happened.

After seeing the dislodged wire mesh and seeing no evidence of a dead Koi and leftovers from a Koi predation around my pond, I suspect that my missing Koi has somehow gone into the filter through the bottom drain.

I am left with the task of opening my filter and removing all filter mats from my first filter chamber. Lo and behold, the Koi was found alive below the filter media in the first chamber and it was recovered.

The day I lost a fish and found half!

To prevent this from happening again, I tied lead weights (the kind used by fisherman in bottom fishing) to the wire mesh, and using its weight to keep the wire mesh down.

This seems to work for a few months, until one day, I found one of my Koi going Missing In Action again.

Apparently, my Koi had grown in size and power and is able to dislodge the cover again.

This time, I found a half decomposed Koi in the filter.

Lessons learnt:

  • Do your counting diligently. Early detection saves lives.
  • Don’t skimp on your pond design. Use a “proper” cover for your bottom drain. Commercially designed bottom drain covers are available here.

Monday, January 12, 2009

Pond Construction pictures

Here are the pictures I took of my first pond construction.

 Koi Pond Construction - excavating the pond

A small excavator is brought into the backyard. You will be amazed how much earth was removed – a few trucks load! The excavation turned my backyard into a construction site overnight. My surprised neighbour popped her head over the fencing and asked, “Are you building a swimming pool?”

 Koi Pond Construction - mould for concrete pondKoi Pond Construction - mould for concrete pond

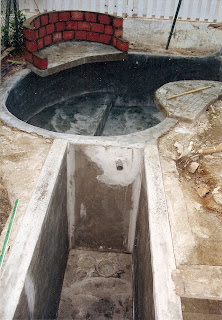
After excavation is completed, the piping work, the initial mould for the pond’s outer structure and steel mesh for the reinforced concrete was put up. You can see the piping for the two bottom drains for the main pond, bottom drains for the filter chambers, some of the piping to the waterfall and to the venturi pipes. 

Koi Pond Construction - finishing the mould for concrete pond Koi Pond Construction - pouring concrete into the mould

This picture shows the pond inner structure completed using plywood. Concrete is then poured into the mould and left to set for a few days. Once the concrete sets in, the wooden mould is dismantled.

Koi Pond Construction - letting concrete set in the mould

The steel bars sticking out of the concrete pond are later bent inwards to form the steel support structure for the waterfall overhang and broken stone paving as mentioned in earlier post. Additional concrete is used after the mould for the extensions are built using plywood.

Koi Pond Construction - almost completed concrete koi pond Koi Pond Construction - almost completed concrete koi pond

Completed concrete pond! The photo (above left) shows the structure for the small waterfall that feeds in to the small, shallow pond for the water garden. This will in turn overflow into the main Koi pond. Now to add the decorative rocks, finishing and build the waterfall structure. The photo (above right) shows the main pond with waterfall structure built using bricks as the foundation. Granite rocks. size of a football, are cemented together to build the waterfall, piece by piece from bottoms up. Nooks and crannies are added in the waterfall structure to provide space to hold soil for plants.

Koi Pond Construction - almost completed concrete koi pond with chengal wood decking

Filter chambers are added into the filter using pre-cast concrete slabs. Wire meshes are added at the bottom to hold the filter media. Timber decks, using water resistance chengal wood, are used to cover the filter system. Removable boards allow filter maintenance. Filter mats are placed in the first chamber. Sacks of crushed corals and shells are placed in the second and third chambers.

For my first pond, I did not pay for epoxy coating. Raw cement will leached and turn water alkaline. To get rid of the alkali in raw cement and “run-in” the pond, I was asked to soak a few pineapples (cut into chunks, skin and all) in the pond for a few days before washing out the pond and refilling it with clean water.

A good time to measure the pond volume, especially for informal ponds where the shape is irregular, is when you are filling in the water for the first time or refilling the pond after completing draining it. The standard water meter, fixed by the utility company, at my house provided the readings. Knowledge of the pond volume is important so you know how much salt or medication to add to the water when treating sick fish later.

The whole construction to this stage took about two weeks. At least now my backyard is no longer looks like a construction site!

The biological filter will still require time to cultivate the bacteria and function properly.  Bacteria cannot grow unless there is fish waste or ammonia to feed the bacteria. A good practice is to add some cheap “sacrificial” fish to start the nitrogen cycle. However, I was impatient and also somewhat confident of my fish keeping skills that I decided to go for it. Shopping for Koi is exciting and fun for the wife and kids. It was an opportunity to visit the rural parts of Singapore where the Koi farms are located. I bought 3 small, average grade kohaku and 2 showa to start my pond. As Koi are relatively expensive, it naturally prevented me from splurging a big sum of money and overstocking the pond from day one.

Freeze-dried bacteria are added to the filter to speed up the process. Bought my first water test kit and started monitoring water quality for the next few weeks.

Glad to say that I did not lose any Koi during the pond and filter start up process was pretty uneventful. I think the regular water monitoring, partial water changes, freeze dried bacteria and maybe some luck helps.

Wednesday, January 7, 2009

Pond Design

The layout is that of an informal pond since the idea is to create a garden and natural setting in my backyard. In my country, most Koi ponds are built using reinforced concrete. The walls are vertical, as in most concrete Koi ponds.

The water return from the filtration system is through a large waterfall falling into the main Koi pond


The water return from the filtration system is through a large waterfall falling into the main Koi pond (shown on the left photo).

A second return is through a smaller “waterfall” feeding into the smaller, shallower pond which was to keep water plants and act as a vegetation/plant filter (shown below). The smaller water-garden pond overflows into the main Koi pond with a drop of about 20 mm.

smaller, shallower pond which was to keep water plants and act as a vegetation/plant filter
Besides creating a nice, soothing sound of gurgling water, the waterfalls are a good form of aeration for the Koi pond. Planting around the waterfall soften the overall look and adds to the natural garden effect.

3 venturi pipes are included in the water return system, serving to further aerate the pond. The pipes are arranged to circulate water slowly in a clockwise direction around the pond which is supposed to be good for Koi and moves dirt and debris in the pond towards the bottom drains.

The pond depth is about 1 m from the ground. The actual water level is 0.85 m from bottom of pond. This is shallower than the ideal depth for Koi but I need to take into consideration the overall size of the pond for a balanced proportion.

Two 100mm diameter bottom drains are provided in the main Koi pond. A removable wire mesh covers each bottom drain. For filter maintenance, I remove the wire mesh, stick in a standpipe and I can flush the filter with lesser water lost through the bottom drains (note: water is still lost by backflow into the filter through the venturi pipes once the pumps are turned off and water level in the filter is lowered!)

A surface skimmer through a 50 mm diameter pipe that feeds into the filter removes surface debris, oil and surface scum. A short, removable standpipe is used to close this skimmer during feeding. A better solution, without need for a removable standpipe, was used for my second pond.

A 50mm diameter overflow pipe, leading to the drain, is provided in the main pond. This is especially needed in Singapore where several inches of heavy rainfall is common during the monsoon season.

Pumps used for the main ponds are Nova 600 (800 W, 3.4A, 16 cubic m/hr, Power consumption/month = 584 KWH) and Nova 200 (350 W, 1.5A, 12 cubic m/hr, Power consumption/month = 250 KWH). I used another Nova 200 for the drain pump. The Nova 600 supplies water to the main waterfall. The Nova 200 drives water to the small pond and also drives one of the venturi pipes. Most of the time, I just operated one 2 Nova 200 pumps. I turned on the Nova 600 (waterfall pump) only when I am spending time in the garden. Guideline is that the entire pond water should be circulated at least twice through the filter per hour.

Tuesday, January 6, 2009

Pond Layout - My First Pond

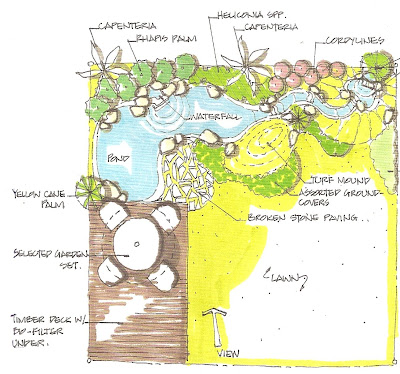
planned layout of my Koi pond
 
This is the planned layout of my first pond. As construction takes place, minor changes were made. A small, shallow pond for a water garden was added, instead of a stream.


almost completed concrete koi pondAs this is a "backyard pond", space is crucial. To maximise the pond volume in spite of limited space, the broken stone paving and waterfall are actually overhanging over the surface of the pond.
 
almost completed concrete koi pond with cantilever out over the pond

The photo of the pond during construction shows the overhangs before the final finishing works. Reinforced concrete was used.


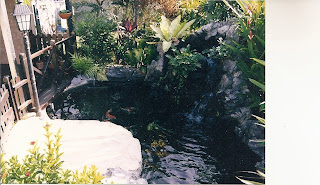
The photo below shows the final effect, taken from another view. The waterfall is at the right of the photo.
completed concrete koi pond with waterfall


Filtration System

There are many documented kinds of water filtration system for the pond. Many companies have designed water treatment products. These products usually consists of a combination of the following:

  • Mechanical
  • Biological
  • Chemical
  • Bead filter
  • Vegetation/plant filter
  • Trickle tower

Mechanical Filter
Aims to remove physical debris from the water. This debris would be any solids that ought to be removed from the water including fallen leaves and insects and uneaten fish food and solid fish waste. The mechanical filter is usually the first stage in a filter system, and it could be in the form of a simple mesh or combination of large brushes.

The Biological Filter
Aims to cultivate a colony of bacteria that does the actual conversion of ammonia to nitrite and from nitrite (NO2) to nitrate (NO3). The discussion often goes into what is the best media to grow these bacteria. Most widely used are filter mats and also crushed coral chips or sea-shells contained in bags made of mesh nettings. The coral chips and sea-shells served a dual purpose of buffering and controlling the pH level of the pond water. Any increased in water acidity would dissolve more carbonates in the filter and hence maintaining a constant pH.

Bead Filter
The bead filter uses tiny beads as a filter media to provide biological filtration.

Chemical filter
Most commonly used are activated carbons as an absorbent. These are sometimes used in aquariums filter but not practical for use in a pond filter.

Vegetable or plant filter
Using water plants to absorb nitrates.


Features of a Basic Filter
All filters has the common aim of passing “bad” water in and getting “good” water out; removing ammonia, nitrite and nitrates and also any other undesirable constituent in the water like parasites, fallen leaves. The following diagram shows the design of a basic filter system. In fact, this is the design used for my first pond.

Features of a Basic Koi pond Filter
This is a gravity-fed system. The pumps located at the last chamber “pushes” water out to the main pond and “pulling” water in through the filter system.

Inlet to the filter, at the first chamber, is from the main pond, through bottom drains using 4 inch (100 mm diameter) diameter pipes. There is also a small skimmer pipe (50 mm diameter) that removes surface debris from the pond to the filter.

The 3 chambers contain the filter media where the biological filtration takes place. The filter media is supported by wire mesh at the bottom of the filter chamber. The first chamber contains filter mats. The original placement of the filter mats was across the water flow. In this case, the filter mat was acting like a mechanical filter which led to problems later on. I later learnt that it is better to place the filter mats vertically, to allow water to flow along its surface.

The second and third chambers contain sacks of crushed cockle shells and coral chips.

The last chamber contains two pumps which forces the filtered water back to the main pond. A third pump serves as the drain pump, removing waste water out to a drain and is turned on only during water changes.

Each filter chamber has a bottom drain that leads to the pump chamber through a 50 mm diameter pipe. Standpipes are used to plug these drains during normal operation of the filter. During maintenance, the main pumps are turned off, the drain pump is turned on and the standpipes are removed to suck debris accumulated at the bottom of each filter chamber to the pump chamber and then out to the drain.

The common rule of thumb is that the size of filter should be one third the size of the pond. The internal dimension of my filter is 0.7 x 2.5 x 1.3 m. Although there are some shortcomings of the above design, this filter was able to maintain crystal clear water for the Koi pond (size 5.7 tons or 1500 gallon).

The above describes a basic filter system that you can build yourself. Read my later post on the Filtration System for my Third Pond if you are looking for a better design.

Many companies have designed water treatment products. Visit these online stores (Pondkeeper UK) which offers many excellent brand/models and provides information to help you choose the right one to buy.